
G’day Goonhammer readers! Over the last six months, both of us (Cytoplasm and Urr) have been preparing new armies for Kings of War. We built, painted and very nearly completed these armies for a tournament in early May; a tournament that just wrapped up.
This is part one of our story, following Matt “Urr” Trewella as he figures out the Twilight Kin, and just how hard they can go.
Dawn of the Twilight Kin
Awhile ago we saw the release of Mantic’s Dungeon Saga, and with it the first previews of the new Twilight Kin. I was particularly positive about them, so after Clash of Kings Australia in January, I’ve been building up the force of the Twilight Kin with all their new releases.
I’m not settled on a final list yet, and not everything is fully painted and based (there was a last minute list change after a playtest game in which I realized I had nothing to sit on an objective), but this is the list for this event.
Big Shield Buddies (2100 points)
2 x Bound Phantoms (Troop)
2 x Impalers (Horde)
2 x Corsair Void-Skiffs (Regiment) - 2 x Harpoons, 2 x Bloodhex
1 x Bound Mind-screech - Planar Apparition
3 x Summoner Crones - 3 x Weakness, 1 x Bane Chant + Amulet of the Fireheart
1 x Bound Voidlurker - The Pride of the Dark Fleet

**Crew of the Heart Seeker Formation**
1 x Impalers (Regiment)
2 x Corsair Fleetwardens (Troop) - 2 x Bloodhex + Veterans of the Celestial War
There’s functionally two wings here: A nice defensive block with the Impalers, Planar Apparition, the Formation, and Summoner Crones; and a fast, punchy wing with the Void Lurker, the Void-Skiffs and the Bound Phantoms.
The Impalers can both take a hit and give one, especially when backed up by Weakness, Heal, and the occasional Bane Chant. The Formation is also harder to kill than most people expect; -/13, Rally, Phalanx and Defense 5+ when it’s important can make a troop stick around when other chaff wouldn’t.
On the other wing, Phantoms are up there with the best chaff in the game (fearless, fast and cheap!). The Void Lurker is just a great dragon, and the Pride of the Dark Fleet upgrade to get Inspiring covers its tendency to die to a spiked nerve roll in a Nightstalker list. And then we’ve got the Void-Skiffs. On paper they are a little lacking as a true hammer unit, hitting on Melee 4+, but there’s a lot of potential there. I’ve just got to learn how to use them properly.
I think this Twilight Kin list is a solid place to start. It’s not the most powerful Twilight Kin army out there, but it’ll be fun to see how it goes across three rounds of 2100 points at our local one-day tournament.
Round 1 – Scenario: Pillage
Andrew’s Abyssal Dwarfs – 2100 points
2 x Gargoyles (Troop)
4 x Abyssal Grotesques (Horde) - Brew of Sharpness, Fire Oil
3 x Angkor Heavy Mortar
1 x Hexcaster - Hex (3), Weakness (3)
3 x Abyssal Halfbreed Champion - Gnome-Glass Shield
First up I’ve got Andrew’s Abyssal Dwarfs, and boy is this a matchup I do not want. In addition to being a great player, this list has been fine tuned to need only 5 profiles, and all of them, bar the Hexcaster & Gargoyles, have enough Piercing/Crushing Strength to put the pain on everything, even the Impalers.
I’m very keen to win the choice of table sides, as I don’t want the Grotesques coming off the hills into me. I also want the first turn, to limit the Mortar shots coming at me. Unfortunately for me, I get neither, and that sets the tone for the game.
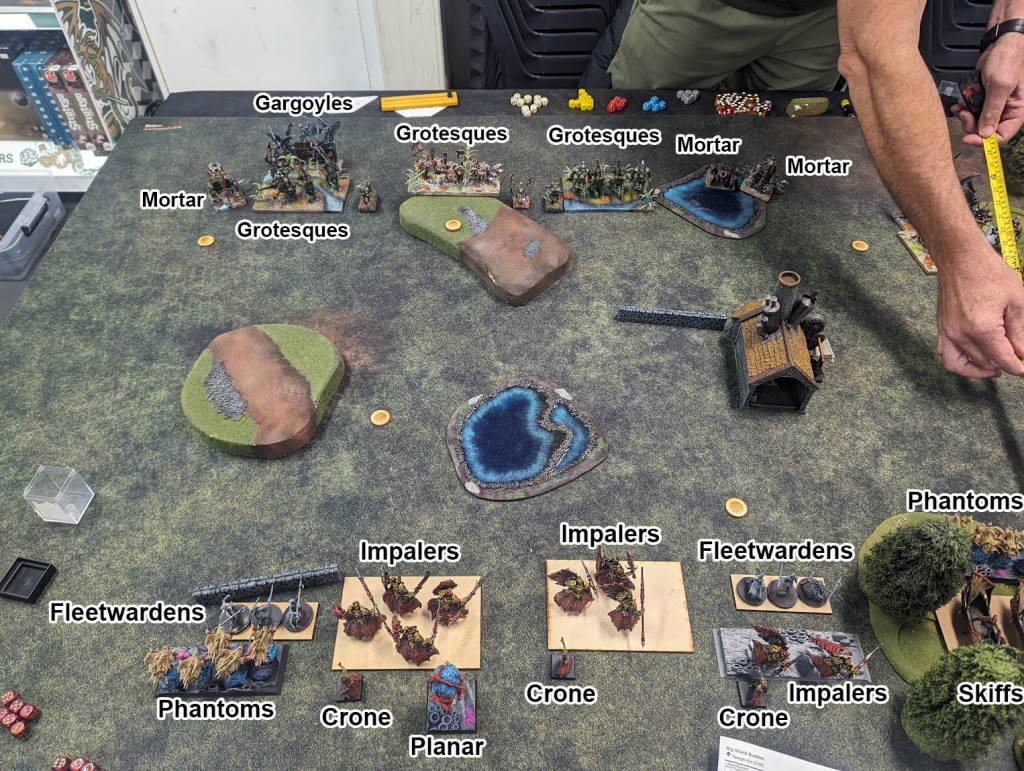
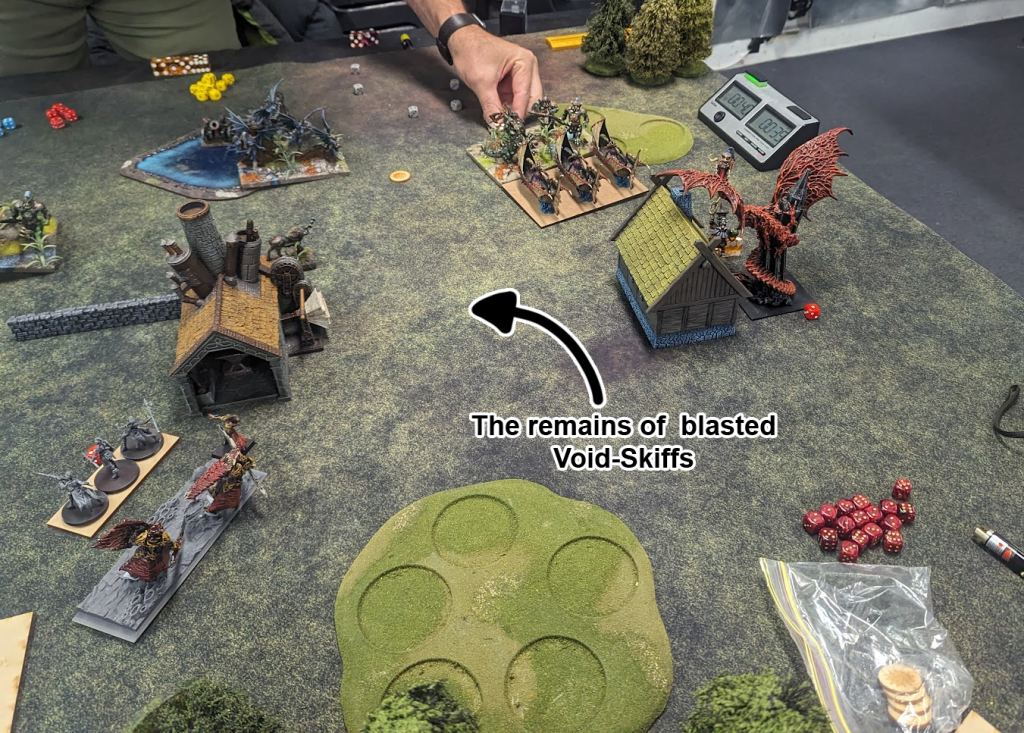
I’m planning to push aggressively up my right flank and shut down the mortars and swing in to face the rest of the army, and I do get some heroics on the side. The Void Lurker manages to take out the Gnome-glass Shield Half-breed Champ much sooner than he should have. The Phantoms and one unit of Skiffs also manage to take out the Grotesques on that side, but are subsequently killed by another Champ and the Gargoyles. They are not in time to shut down the Mortars, and it is hurting. Andrew’s War Machines are rolling hot, and I’ve taken about 30 wounds by my turn two. I’ve lost a Skiff Regiment and one of my Corsair Troops, and taken a stack of wounds on Impalers.
I heal most of the Impaler’s wounds back, but he’s Hexed the Mindscreech, who hurts itself rather badly, and a second Hex finishes it off on the next turn. Bad positioning means I can’t fit my Impaler Regiment anywhere, and I have to flank some Gargoyles with a horde, just to make some room to move. And they promptly double one it, leaving a nice juicy flank to the Grotesques.
Over the next few turns, I am trampled under the disgusting feet of the Grotesques. I end up with just the Crones and the Void Lurker left, and hold no tokens to Andrew’s five, so it’s a big loss to me.
Even though there were some skewy dice rolls, there are plenty of good lessons to take away from this game. I’m too used to playing Nightstalkers, and losing both units of Skiffs and some Phantoms due to a lack of nearby Inspiring is an easily solvable problem. One Skiff and the Phantoms were pretty much guaranteed dead, but any chance to keep them alive is better than nothing.
I also managed to jam myself in against terrain. The formation Impalers did nothing for the game, being unable to make their way past the Corsairs. They ended up just being dead weight. In fairness, this matchup is just bad for them. They are a great blocker against most regular infantry, but the Grots or Mortars will just pick them up.
Throwing away units for nothing is also a bad idea. It would have been much better to save the Phantoms to eventually get a war machine, or even just an objective, than trying to block the Grots without being able to capitalise on the block. The Impalers should actually be able to take a hit, especially once the Grots have been Weakened (though maybe not with those hills involved).
In the end, a good game, though a short game. There’s nothing like putting the models on the table and rolling some dice to see your best laid plans come apart.
Round 2 – Scenario: Hold the Line
Geoff’s Varangur – 2100 points
2 x Draugr (Horde)
2 x Mounted Sons of Korgaan (Regiment) - 2 x Guise of the Deceiver
2 x Tundra Wolves (Regiment)
2 x Snow Foxes (Regiment)
1 x Lord - Mounted on Horse
1 x Thegn on Frostfang
1 x Lord on Frostfang
1 x Snow Troll Prime
1 x Lord on Chimera
Next up for the Twilight Kin was Geoff’s Varangur. It’s a very fast and punchy list, and it was going to be a tough match.
We’ve got two units of Mounted Sons, a Chimera and a Lord of Frostfang as absolute heavy hitters, and with the addition of Pathfinder to Tundra Wolves, they also become a medium hammer. Snow Foxes are still great chaff, and two Draugr Hordes are good for holding objectives and just sticking around when needed. There are only three units in the army that are slower than speed 7, so it’s very unlikely for me to be picking the charges in this game. I’ll get to see first hand just how well the Twilight Kin can take a hit.
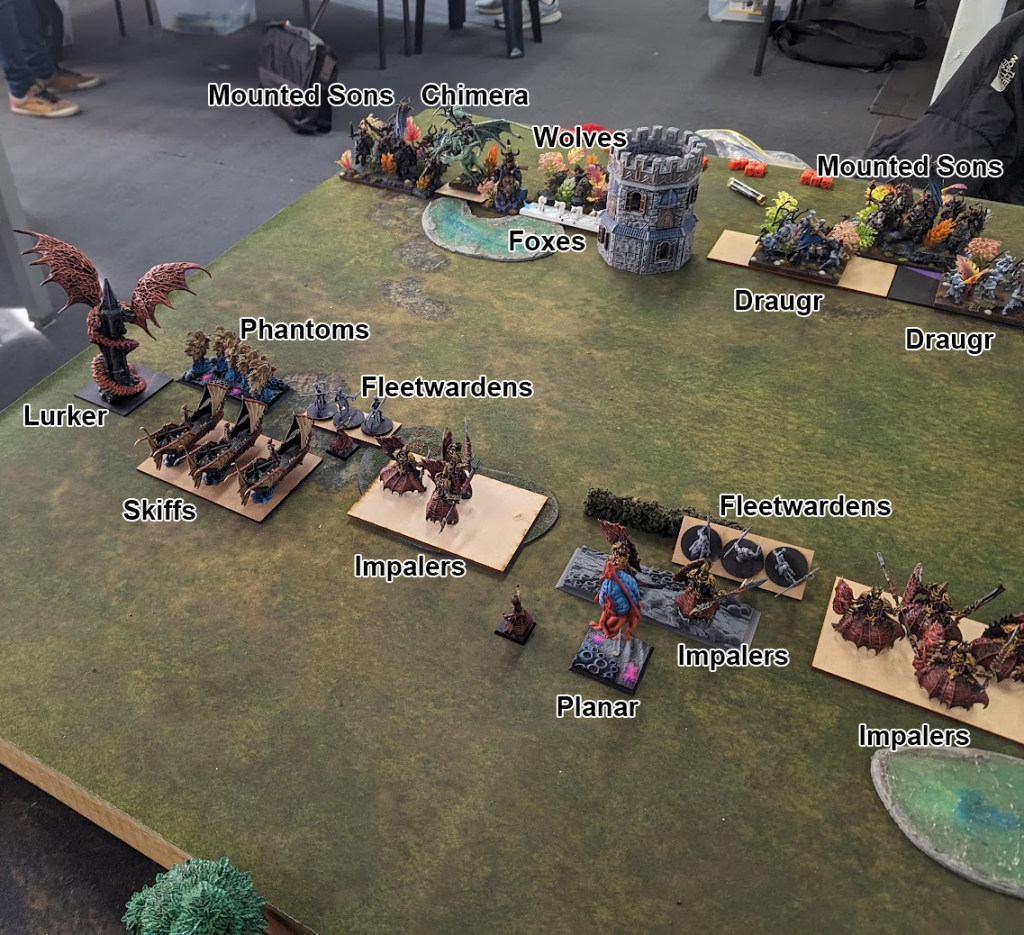
We’ve deployed spread across the board, with most of our fast stuff on my left flank, with a smattering on the right, and the middle is just lined up to grind, with the Impalers facing off against the Draugr.
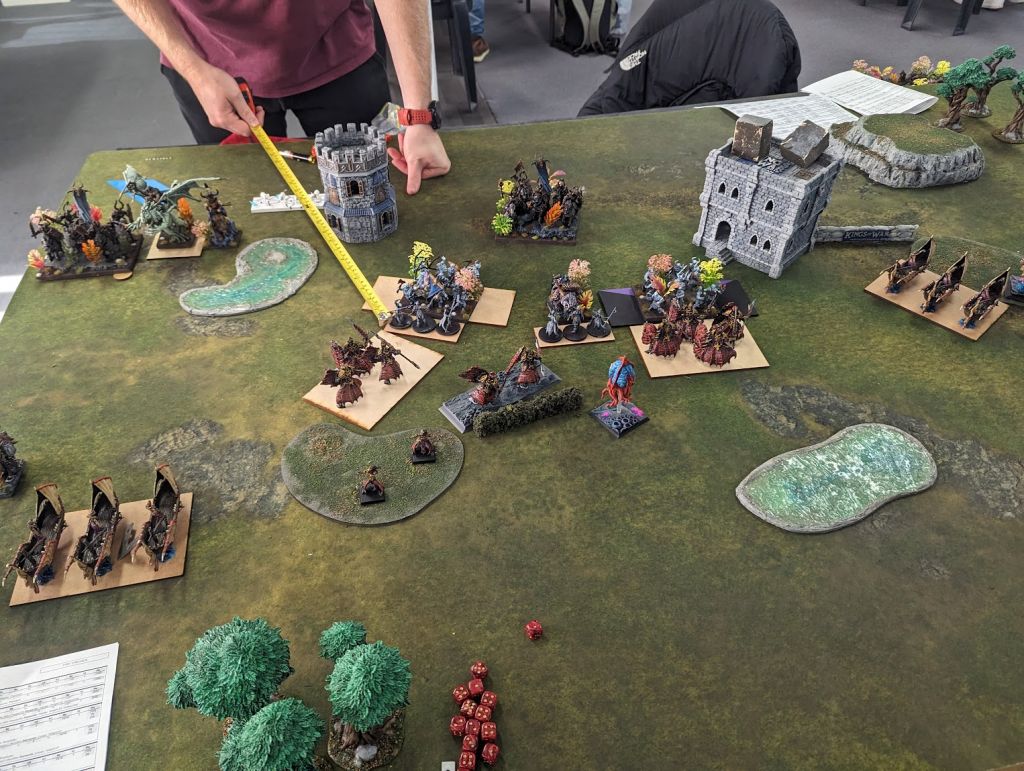
I do get the first turn this time. It’s just moving up and repositioning, with a few bits of chip damage from spells. I put the Phantoms up to threaten a charge, while being the only target for Geoff’s Chimera. If he takes it, I’ll kill the Chimera, a good trade for me, and if he doesn’t, I can charge the Snow Foxes, and lock both them and the Tundra Wolves in for a turn or two.
The only shooting this game comes from me, so I know I’ve got to delay things to take advantage of that, and I start with Weakness on the right flank, wavering Geoff’s Snow Foxes, which will end up being a big deal.
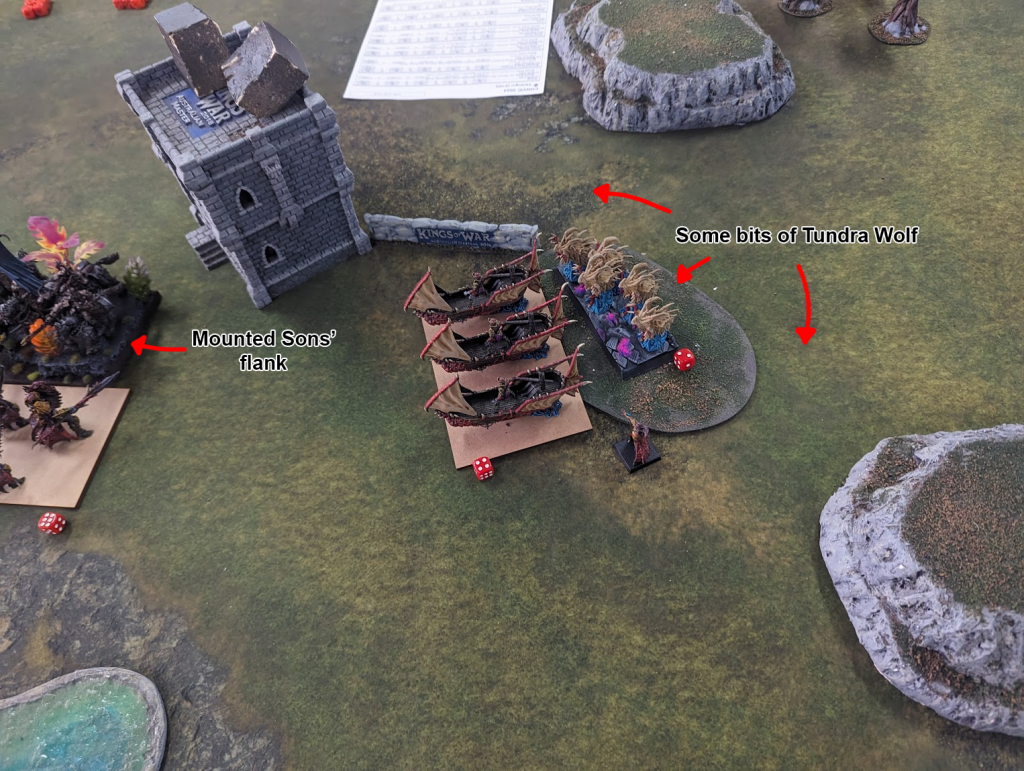
Geoff runs his Wolves forward in his turn, unprotected by the Snow Foxes (who were wavered, but supported by the Troll. On the left, the Lord on horse comes forward to do the same as my Phantoms, to bait out something big, or lock down the Void Lurker on his next turn.
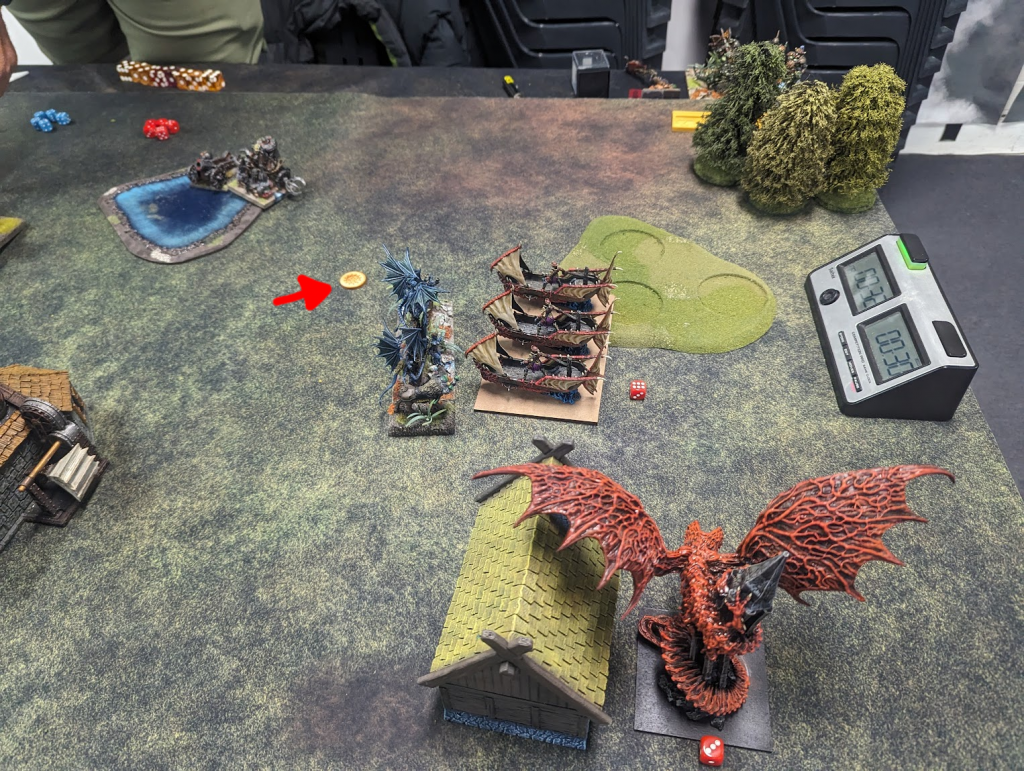
From my Turn Two, things just keep going well for me. On my right, the Phantoms overperform dramatically, and instead of putting on just a few wounds and blocking the Tundra Wolves for a later Void-Skiff charge, they kill them instead! Things would just keep going well for me on that side with the Phantoms, Skiffs and Crones combining to kill everything on that flank by the end of the game, and all three pieces surviving as well, locking in that flank as mine. The Skiffs even get to play the middle, coming in on the final turns to help finish off the Mounted Sons who had hidden behind the Draugr for most of the game.
A lot of this game is further decided by Geoff bouncing basically everywhere. The Thegn on Frostfang can’t push his way through the troop of Wardens, the Draugr can’t get through the Impalers (though they do make it through the other Warden troop, thanks to my misplacing of Inspiring). The remaining Tundra Wolves get the Phantoms, but the Skiffs get the Wolves. Most importantly, when the Mounted Sons come in, they both fail miserably.
In the middle, the Mounted Sons hit the Impalers, and do about average, but the failure to break them sees the Void-Skiffs get a nice flank. On the left, the other Mounted Sons absolutely flub their charge into the Void Lurker, only doing 5 wounds instead of an expected 10. The Lurker hits back and rolls a big Nerve for a waver, and with that wipes them on the following turn, again overperforming.

The Lord on Frostfang gets a free flank on the Planar Apparition, which I wasted attempting to block the Draugr from the Impalers flank. All because I still can’t get any use from the Impaler regiment in the Formation. The Lord on horse and Chimera try their best to crack the Impalers, and fail, and with a Turn Seven, I clear up everything bar the Lord on Horse and the Lord on Frostfang, and control all scoring areas.
I think good rolling got me this victory, and I would highly recommend this tactic to all. Cracking that right flank so early with no loss of resources was wild. That should have been harder to contest, and it definitely could have gone the other way with more average dice, but I’ll take it. Again, I’m learning the same lessons as from the game with Andrew. Inspiring positioning is important, the Formation is hard to use, and lucky dice can just win you games, if you’re in a position to capitalise. On to Round 3!
Round 3 – Scenario: Stockpile
Yan’s Ogres – 2100 points
1 x Hunters (Horde) - Brew of Strength
2 x Warriors (Regiment)
2 x Siege Breakers (Horde) - Staying Stone, Chalice of Wrath
1 x Warrior Chariot (Troop) - Skirmisher’s Boots
1 x Red Goblin Blaster
1 x Crocodog Wrangler
2 x Sergeant - Mounted on Chariot, Crossbows
1 x Berserker Bully
1 x Warlock - Lightning Bolt, Hex, Conjuror’s Staff
1 x Nomagarok
One big loss and one big win sees me up against Yan’s Ogres. It’s a reasonably typical Ogre list, with a few fun extras spread around. You don’t see Goblin Blasters in many lists!
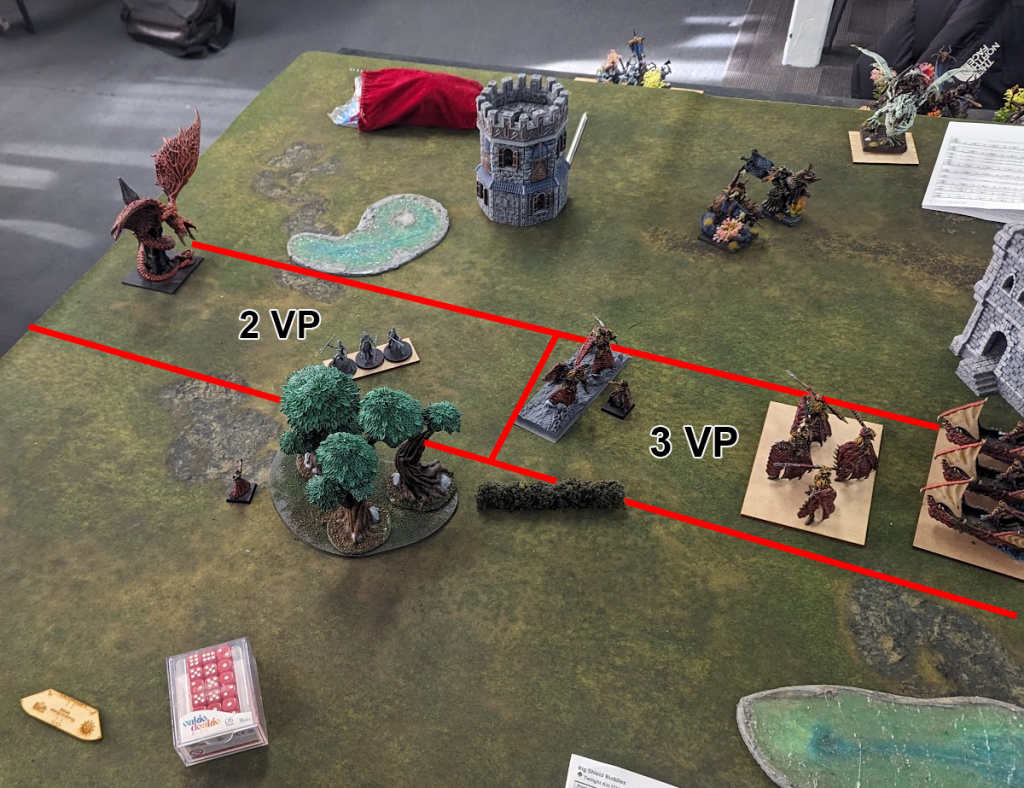
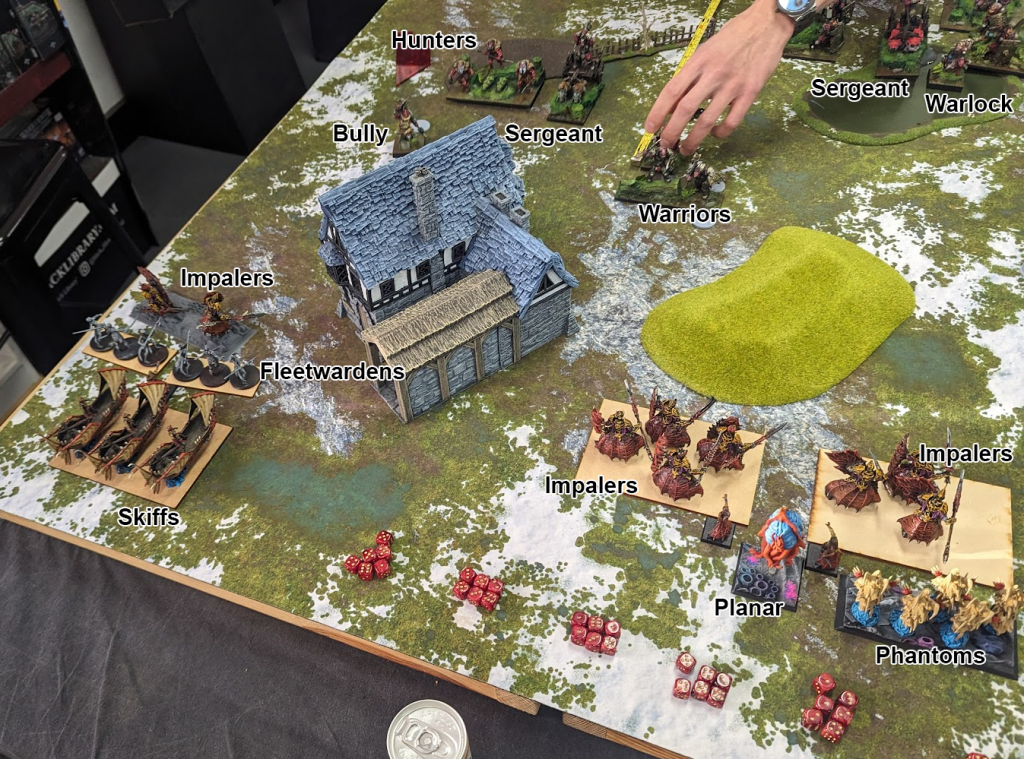
I deploy my forces mostly across the middle, with a sprinkle of Void-Skiffs and the Formation on the left, so I can go after all the tokens. Yan lines up to bully the centre-most two Stockpiles, with enough on my left to make me struggle. For those not familiar with this newer scenario, Stockpile involves three piles of objectives – one pile with 3 tokens in the middle, and two piles with two tokens each along the centreline. A unit can only pick up one token at a time, so it’s important to have units that can either sit there, or multiple waves of them to get them all in the end.
Yan gets the first turn and comes out firing. Moving up aggressively and moving to grab tokens off all the piles, he also puts a chunk of damage on one of the Skiffs with the combined shooting of the Sergeants and Warlocks.
My first turn is not much of anything. A bit of shooting to keep Yan in check (a little), and I move up into what feels like a good spot. I do throw those injured Skiffs forward into a regiment of Ogre Warriors, trying to get some use out of them before they get shot off. Unexpectedly, the Planar Apparition rolls well on his Heal and the Skiffs are fully restored. They do waver the Warrior regiment, so it’s not a bad outcome at all.
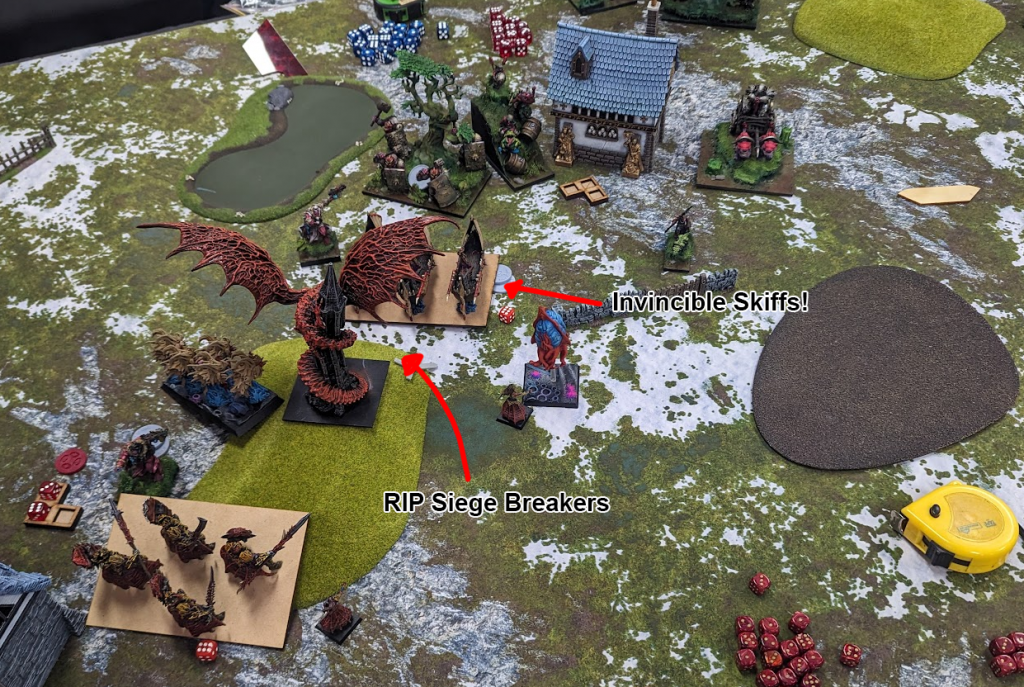
It’s only Turn 2 now, and it looks like it’ll be a game-defining turn. I ask the reader, do you see any position long mistakes in the photo below?
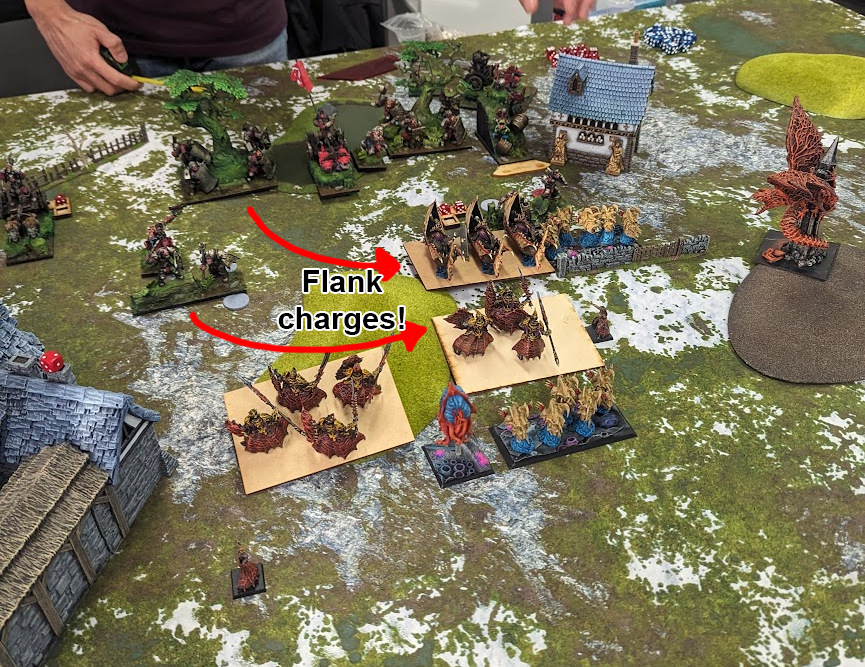
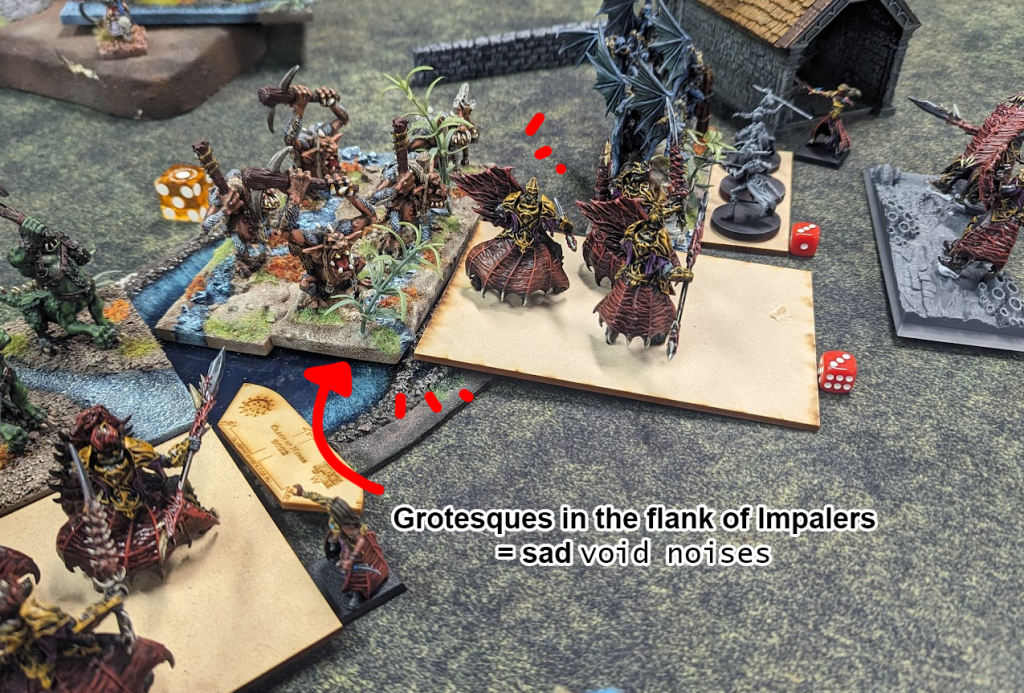
Yan did, and the Warrior regiment on the left goes into the flank of the Impalers, and kills them. On the left, the Hunters and Bully make short work of a Warden Troop. But back in the middle, the Siege Breakers barrel into the flank of the Skiffs. However, after some of the worst rolling I’ve ever seen (both terrain and Bloodhex coming in clutch for me here), the Skiffs are fine, and back up to only 5 wounds or so.
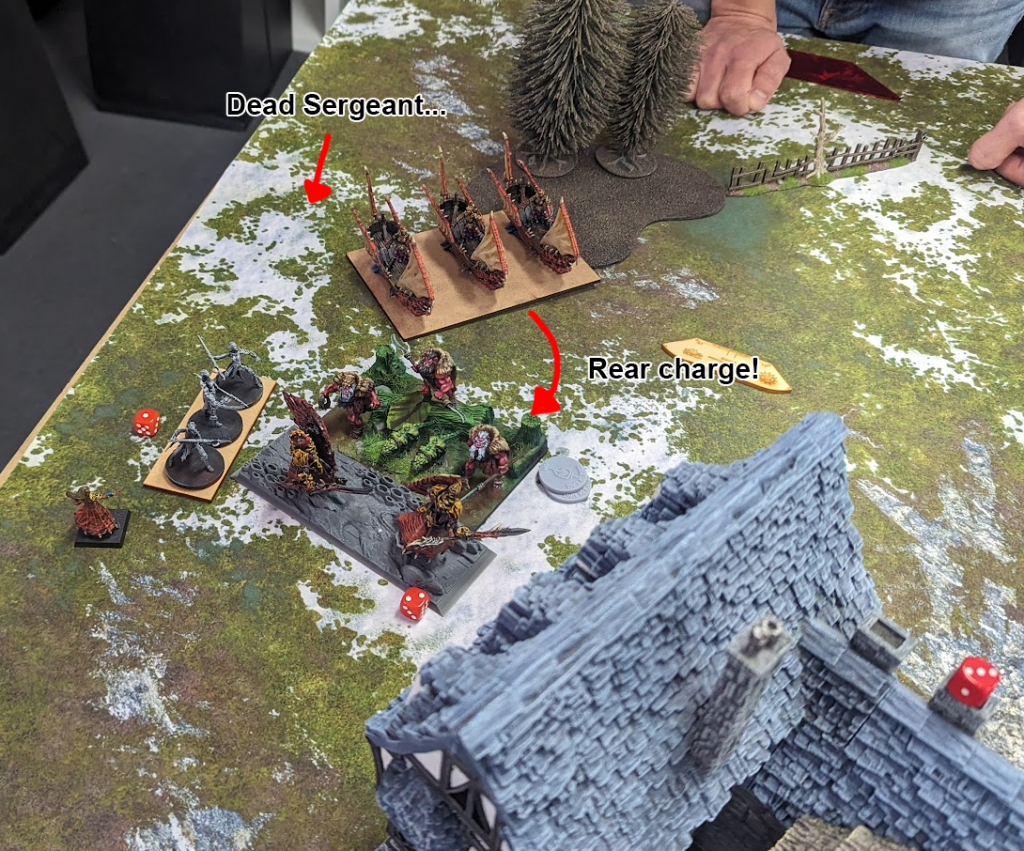
Luckily for me, Yan’s also mucked up a bit of positioning, giving the other Void-Skiffs on the left an open flank into the Sergeant on Chariot. They manage the kill single handedly. So while I keep body blocking the horde of Hunters, I’ve now got a rear charge set up, and should now win the flank easily, and lock down the two tokens there.
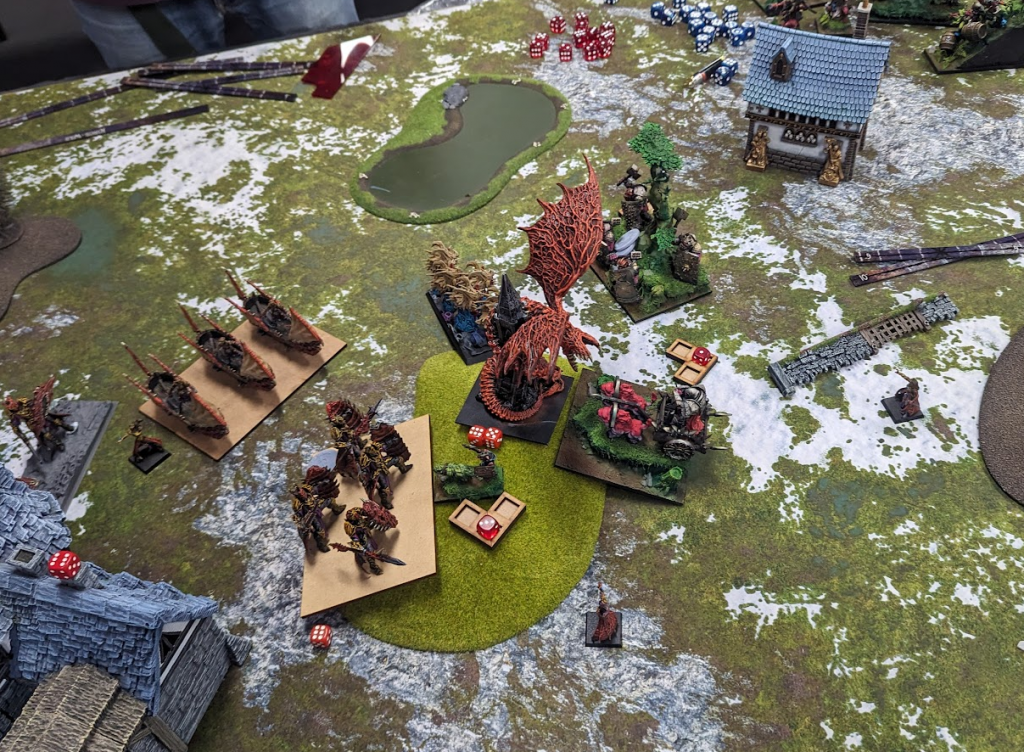
One Phantom unit and the Void Lurker kill that pesky Warrior unit in the middle, while the other Phantoms manage to drive off the injured Warriors and then block the remaining Siege Breakers and Blaster. The Skiffs try their hand at the Siege Breakers, and another good heal keeps them in the “there’s a chance” survival category.
In the next turn, the Skiffs somehow survive again. The Siege Breakers are really not performing this game (it’s a bit of a running joke for Yan at this point). This is is going to let the Void Lurker and Phantom get into the flank of the poor lads, and suddenly I’m back playing for the win. The “failure Sieges” go down, and at the same time the Hunters on the left flank go down. The remaining Impalers waver the Warlock holding two more tokens.
From here, it devolves into a melee in the middle, as we both try to bring our flanks in. Yan is trying to at least lock down the three tokens in the middle, and see if he can get around to the Impalers, who’ll finish off the Warlock and grab its tokens shortly. I’m trying to make sure I end with those two tokens, plus the two on the left flank.
The Chariot troop does a nice job over the last turns, killing the Planar and putting quite a chunk of wounds on the Void Lurker, while the Crocodog Wrangler attempts to take out the Impalers, but has no luck. The remaining Siege Breakers just sit on the token pile, stacking them up.
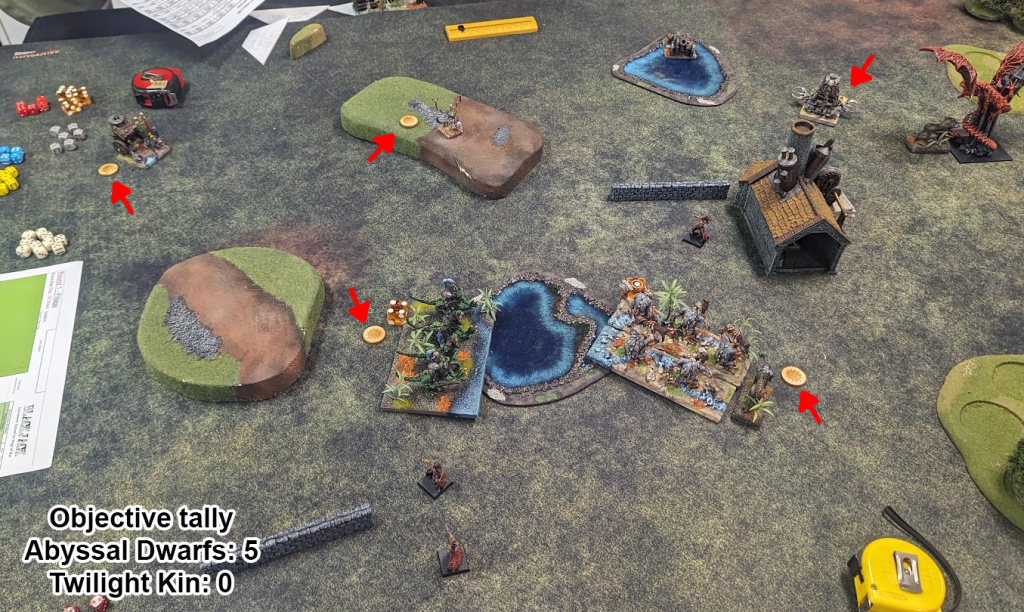
My Turn Six sees the crushing of the Warrior Chariots and the Crocodog Wrangler, leaving only the Siege Breakers left. Having the end of turn, I also set up for a Turn Seven, jumping the Phantoms over to flank the Siege Breaker, and leaving everything else just out of charge range, unless he drops the tokens. Yan elects to hold them, so there’s one final charge of Void-Skiffs and Phantoms into the Siege Breakers, plus all the Weakness I can throw at them, and they die, giving me all the token, and tabling the Ogres.
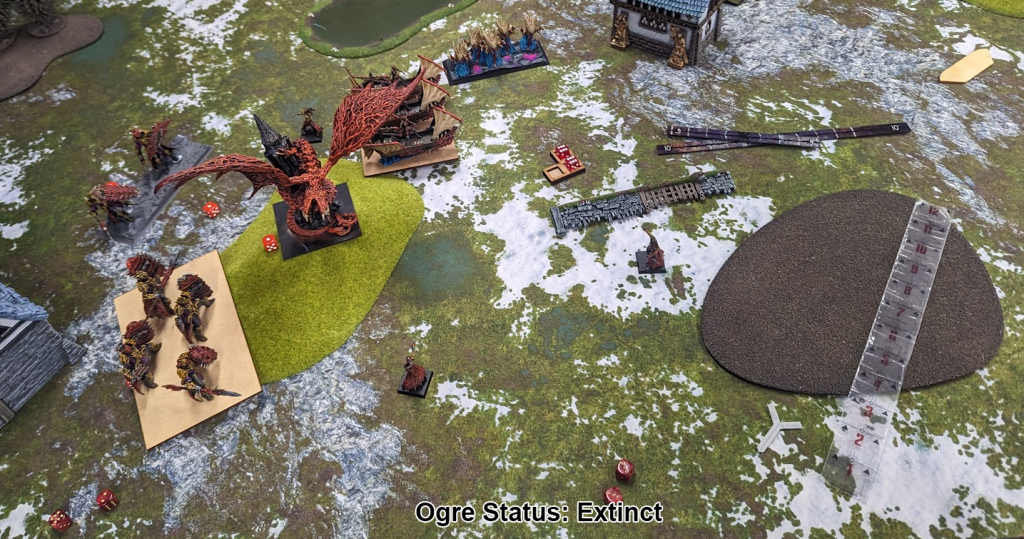
Now this was another game that felt dictated by just how bad Yan’s Siege Breakers rolled. The Void-Skiffs in the middle did such a good job at holding against them. It was astonishing. They got four turns of getting in the way and causing trouble that they really shouldn’t have had, and that led to things like the Void Lurker getting into the flank of the Ogres and killing them when it otherwise wouldn’t have.
Losing the Impalers was a similar thing, but I got revenge quickly, rather than four turns later. It was a reminder of how precise the positioning of the Impalers needed to be though, so I won’t make that mistake again!
So where does that leave the standings? After one big loss and two big wins, I’ve jumped my way up to fourth, and I’m definitely happy with that. I will brag a little now and say that with the Masters qualifier points from this event, I’m now sitting at Number 1 in the Australian Masters Rankings! I’m sure it’s not for long, but it’s nice to be there, even temporarily.

Check out the up-to-date info at https://kingsofwaraustralia.com/
Moving Forward with the Twilight Kin
There’s a few changes to be made to the Twilight Kin army list. The Formation is going to go. It just felt too clunky, and didn’t give enough bang for the buck. That frees up 375 points, so what do I fill those with? I’m not exactly sure. I’ve made another 6 lists to play around with, and, spoiler alert, I’ve just finished painting 20 Void-Touched Mutants, who may make an appearance.
Thanks for reading, and we’ll see you next time, with Part Two: Invasion of the Riftforged Orcs.
Have any questions or feedback? Drop us a note in the comments below or email us at contact@goonhammer.com. Want articles like this linked in your inbox every Monday morning? Sign up for our newsletter. And don’t forget that you can support us on Patreon for backer rewards like early video content, Administratum access, an ad-free experience on our website and more.
