
I was excited to get my hands on the first Conquest campaign pack: Crucible of Wills, the Stone Face Campaign. The Warhammer codex system is deeply outdated and awkward as a means of delivering rules, but the one thing it is great at is expositing lore. Buy a codex and you’d be presented with a collection of short stories, context and worldbuilding you could use to develop a unique faction or fall in love with an existing one. Especially in this day and age when a small child is keeping me away from evening events, being able to ‘single player’ a wargame by rereading a codex would be one of the ways I could really engage with my hobby at a distance.
Conquest’s Lore Campaign Pack is not that. In fact, I’m not quite sure what it is – it’s possibly the most niche product I’ve ever seen in wargaming. I’ve come away from it more than a little baffled and am asking myself ‘who is this for?’ The obvious answer is ‘A Dweghom player and a Hundred Kingdoms player who play against each other regularly,’ but I suspect the true answer is ‘A Dweghom player who wants a sweet model and can get a Hundred Kingdoms player to defray half the cost of it.’
The Models
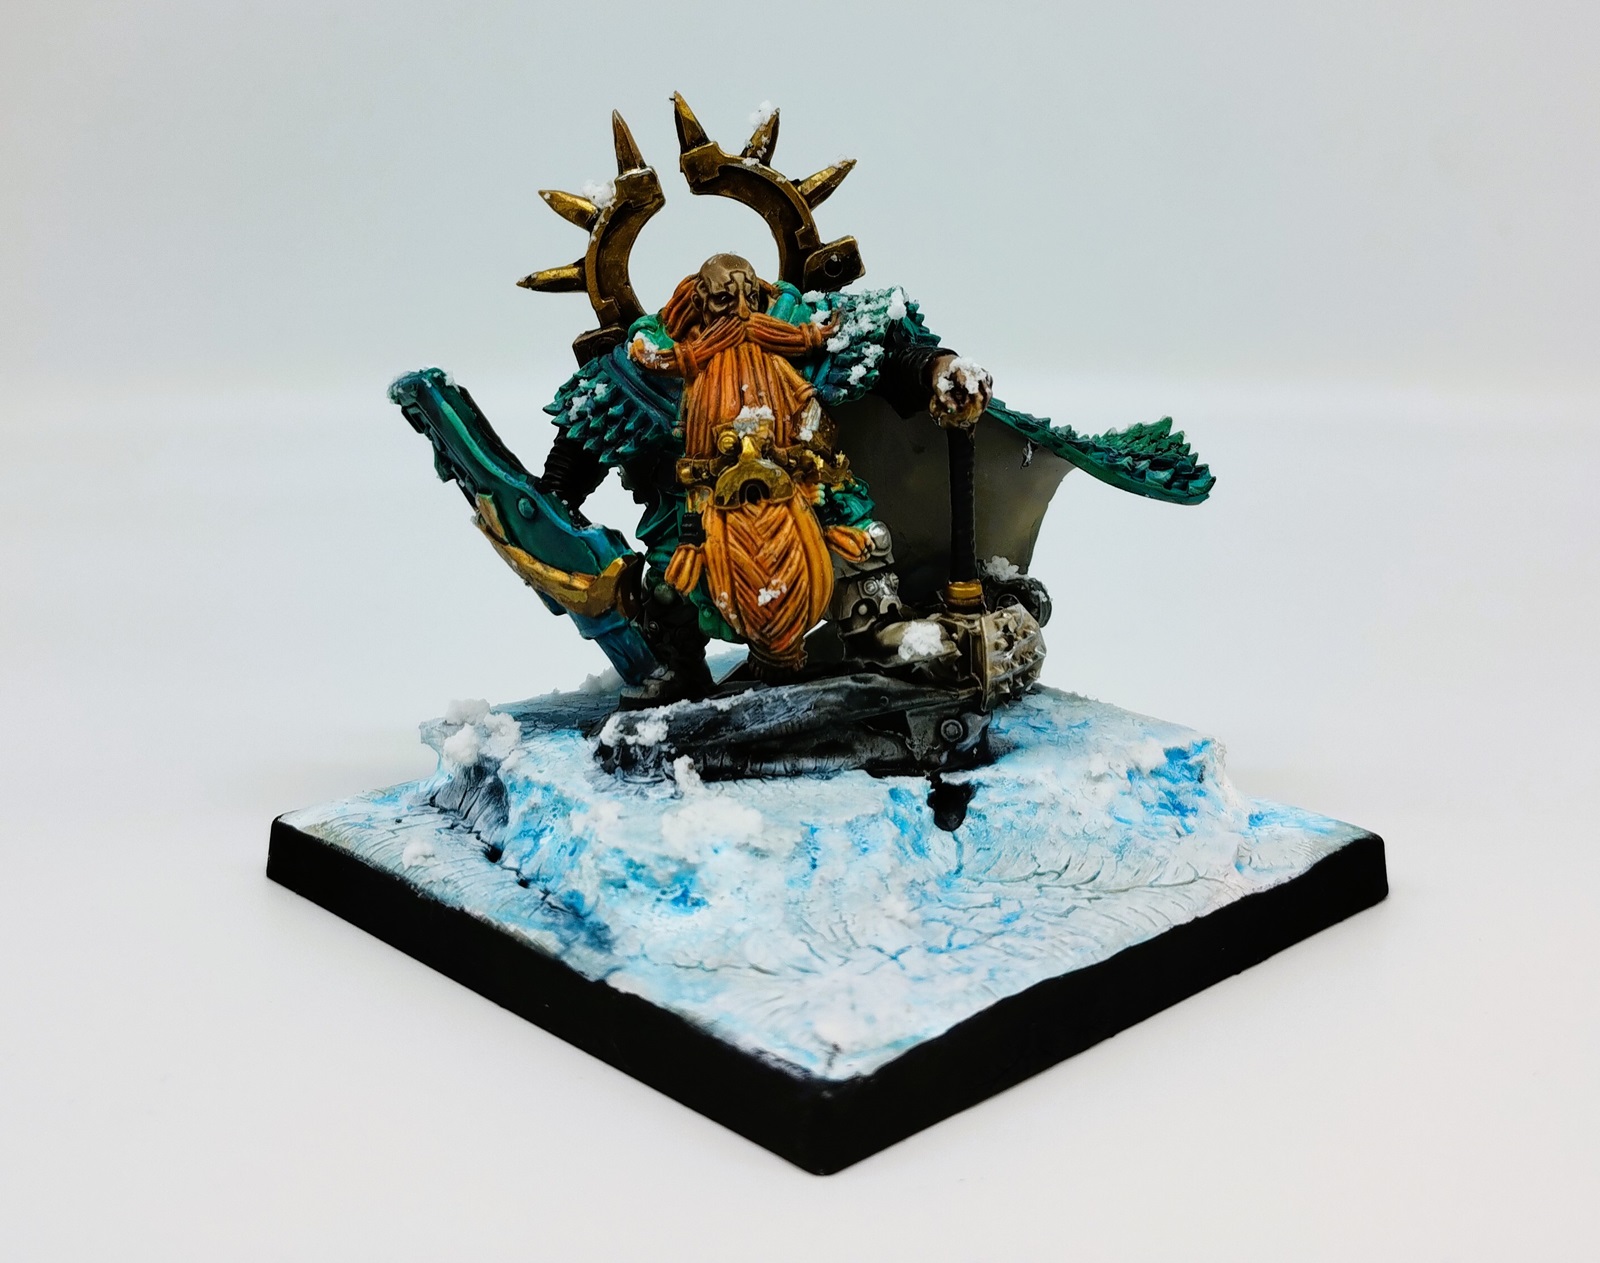
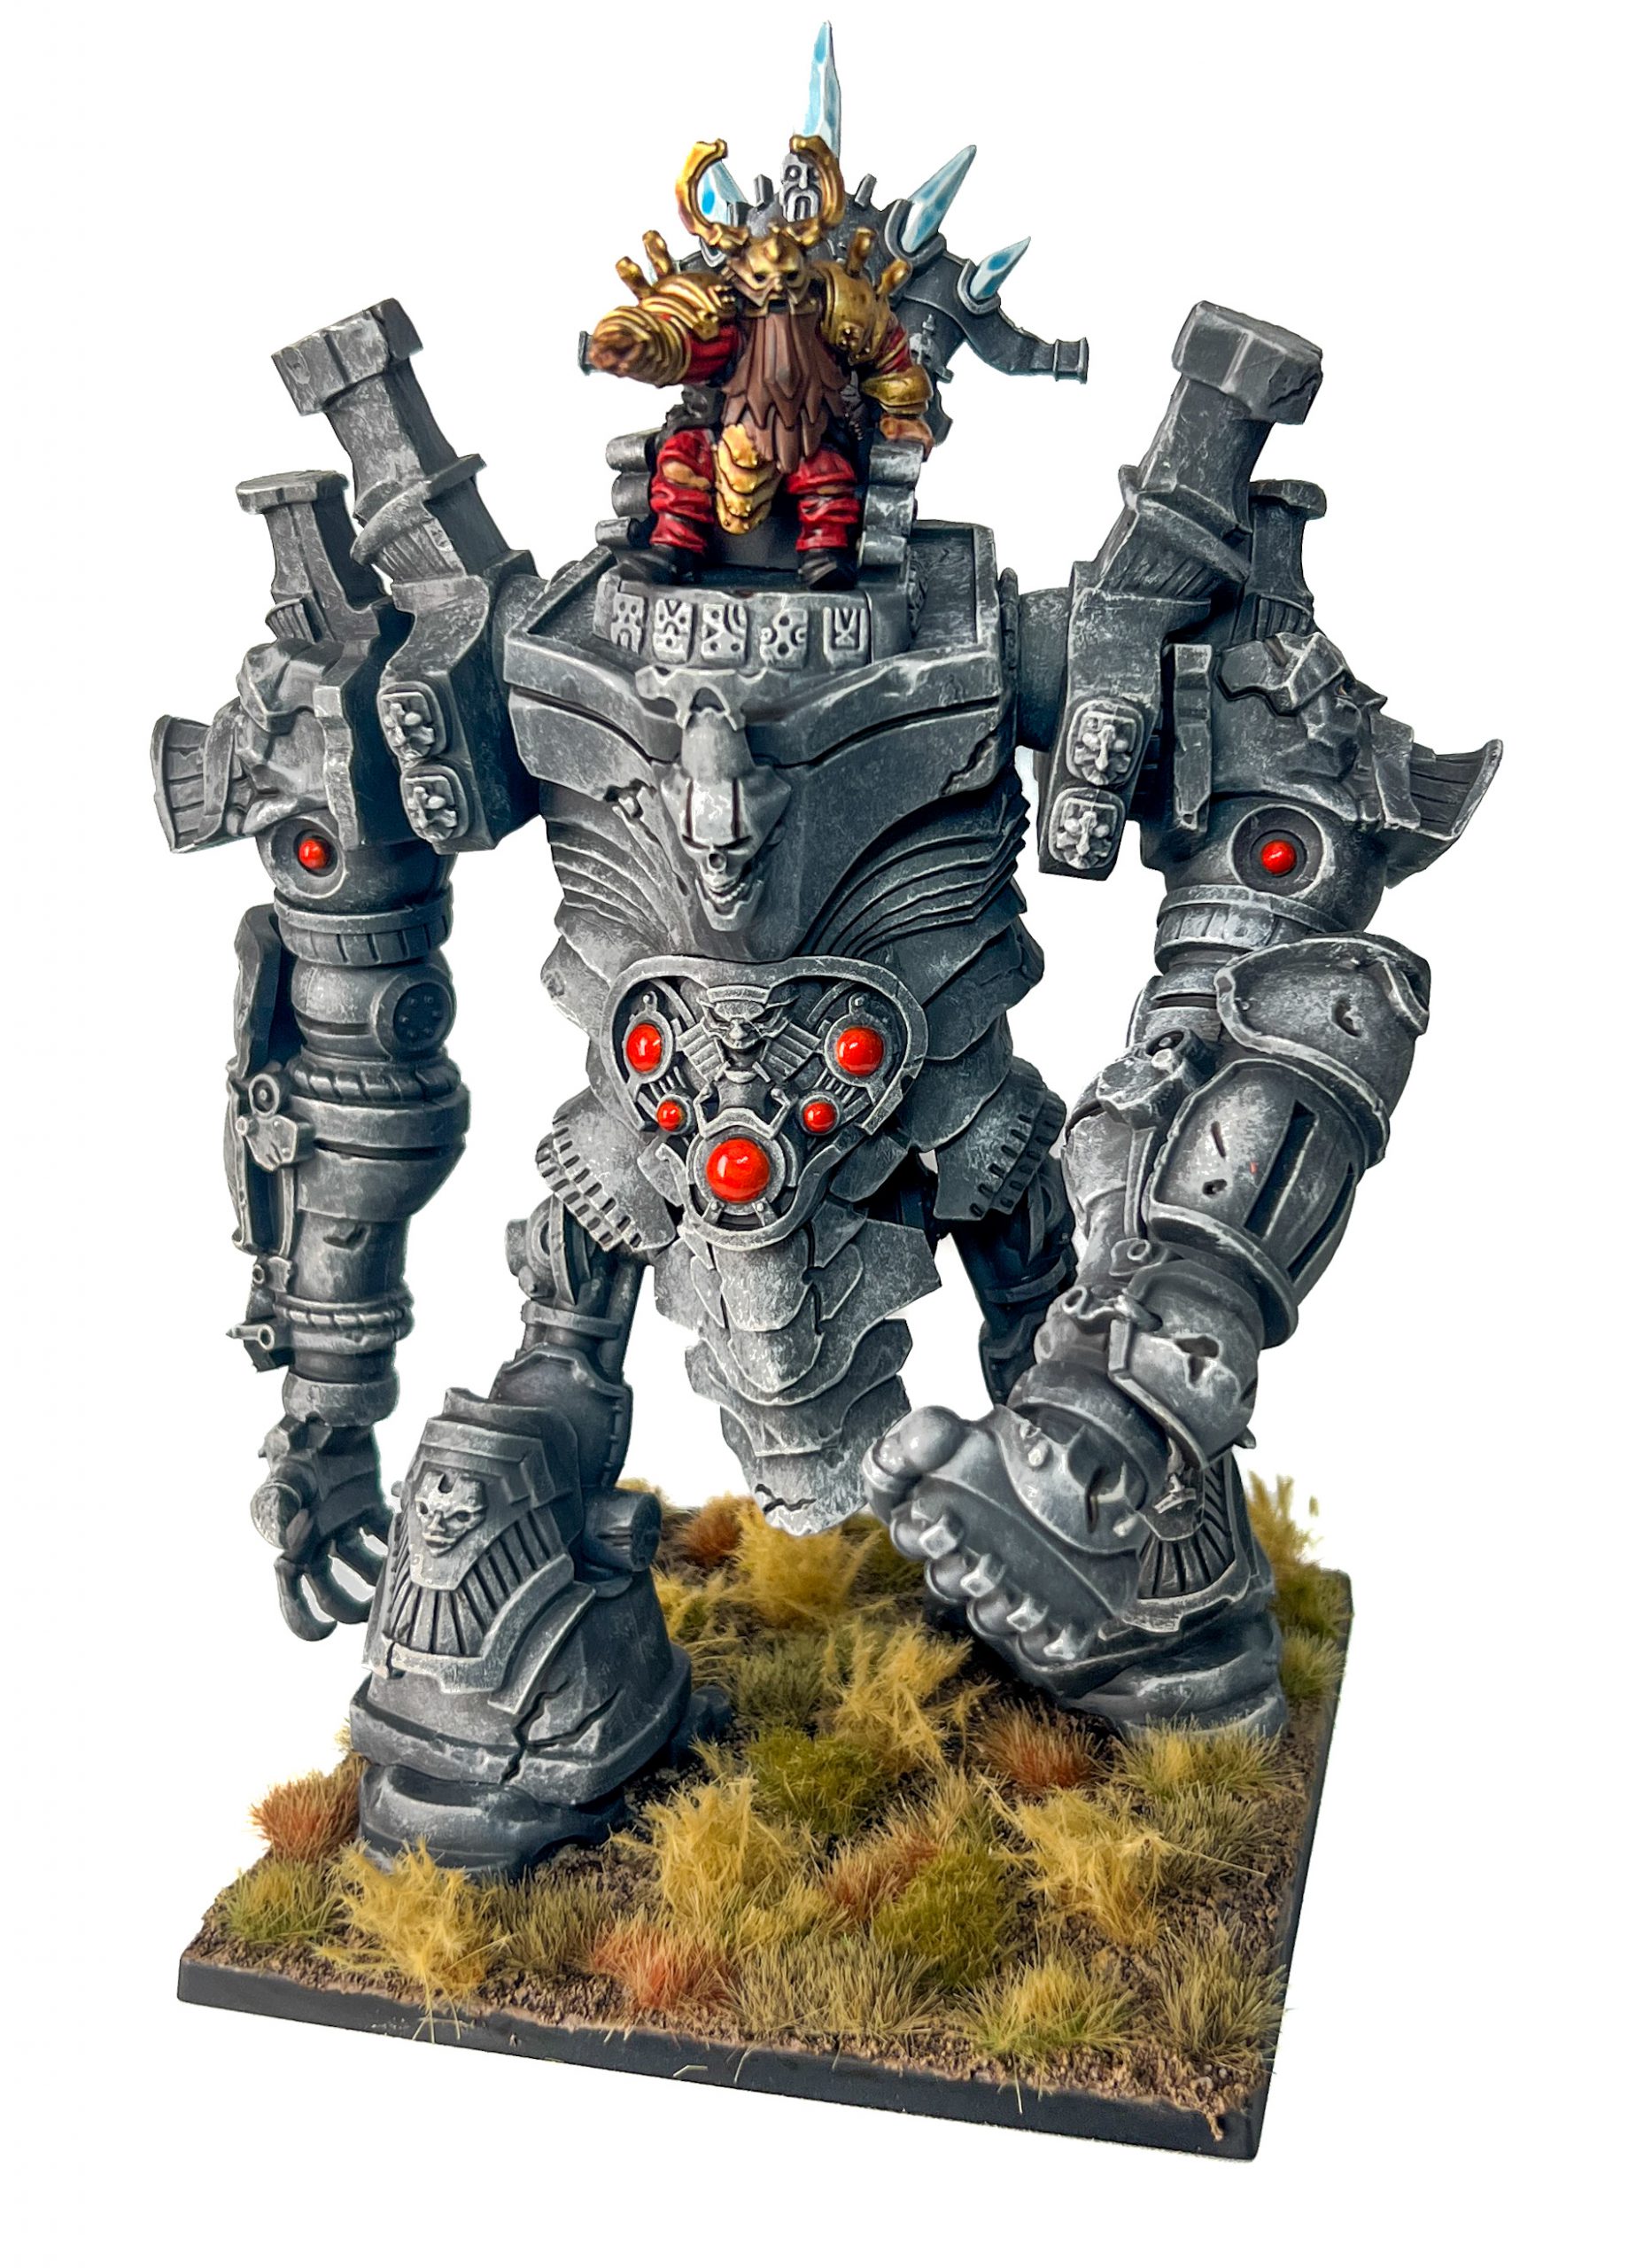
There are two models and I think that the win here goes overwhelmingly to the Dweghom. The Stone Faced King is so good that it genuinely has me taking a second look at the Dweghom faction. He’s the first model Para Bellum have made that takes advantage of characters being on a stand of their own and he’s an absolute unit. Dominating presence, powerful stance, you can build him with the back banner totem off and it looks just as good. Smash hit.
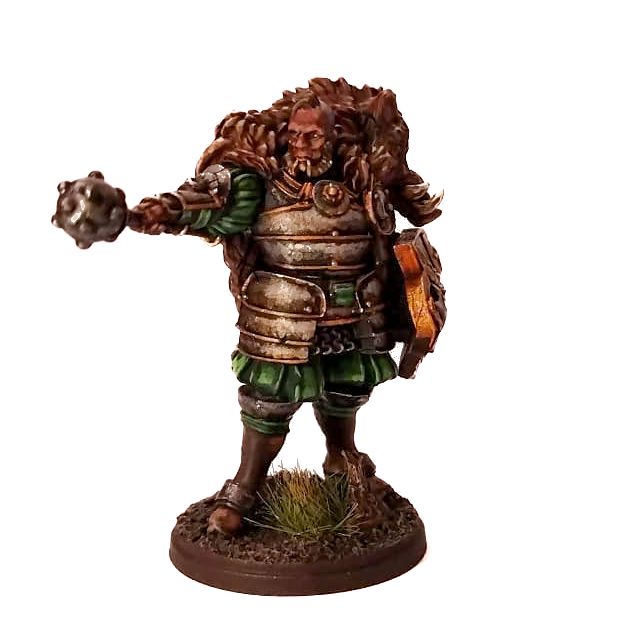
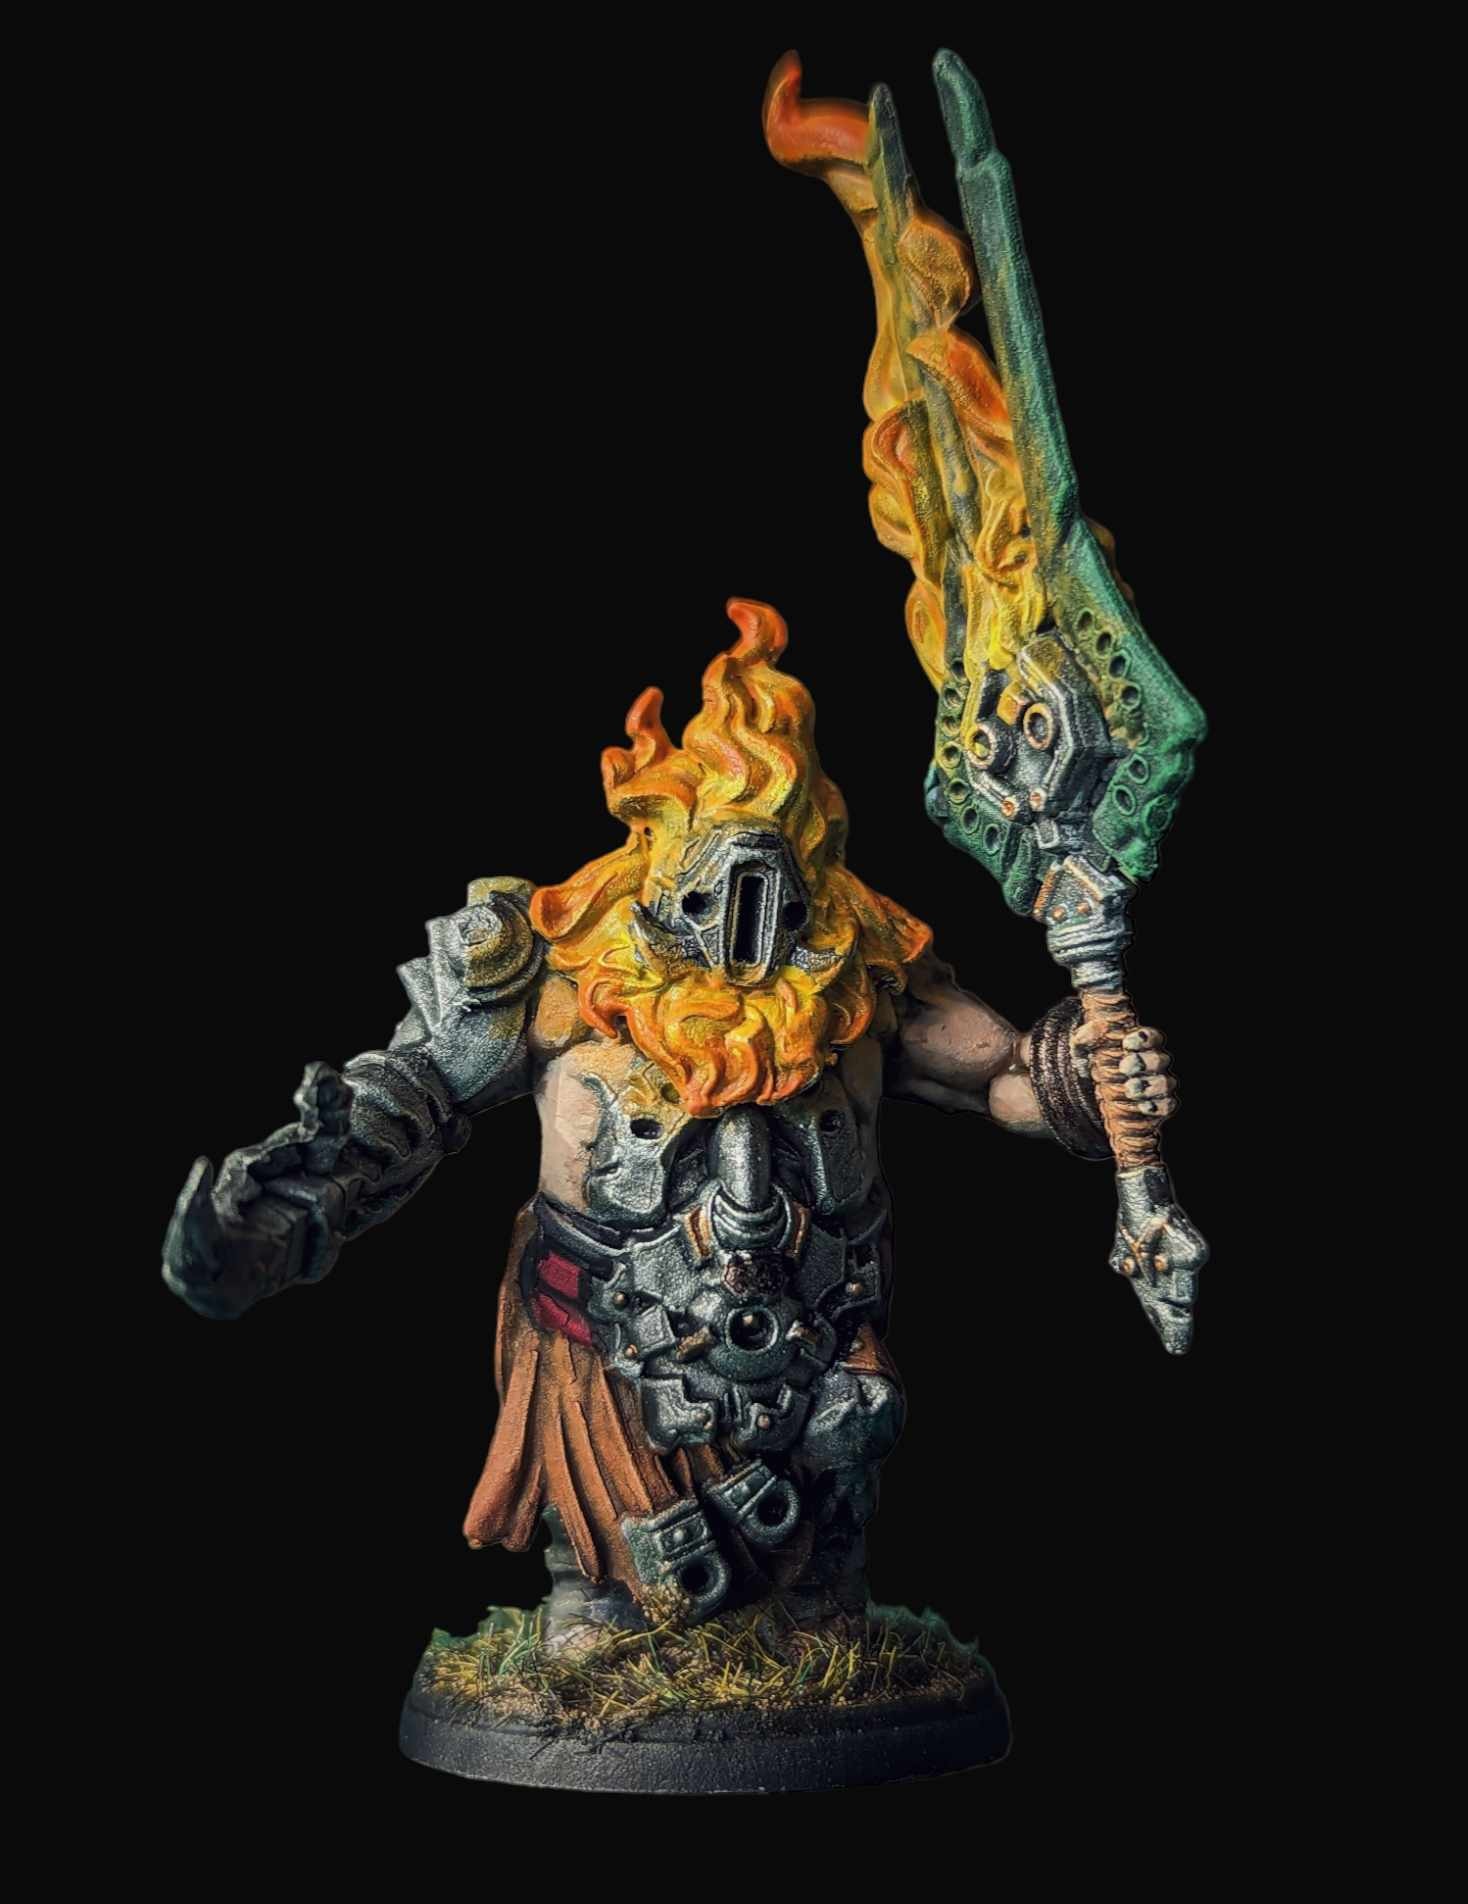
The Hundred Kingdoms model is, by comparison, just some fuckin’ guy. I get that’s the Hundred Kingdoms appeal, I’ve built and painted several thousand points worth of Hundred Kingdoms, but Mr. Schur kind of has nothing going on. He has a dumpy little mace he’s holding just below the round head and a little toy shield that doesn’t fit in with any other Hundred Kingdoms shield design, and also he doesn’t have the Shield special rule so I really don’t know what’s going on there. I disliked the core build enough that I converted him into an Old Dominion model.
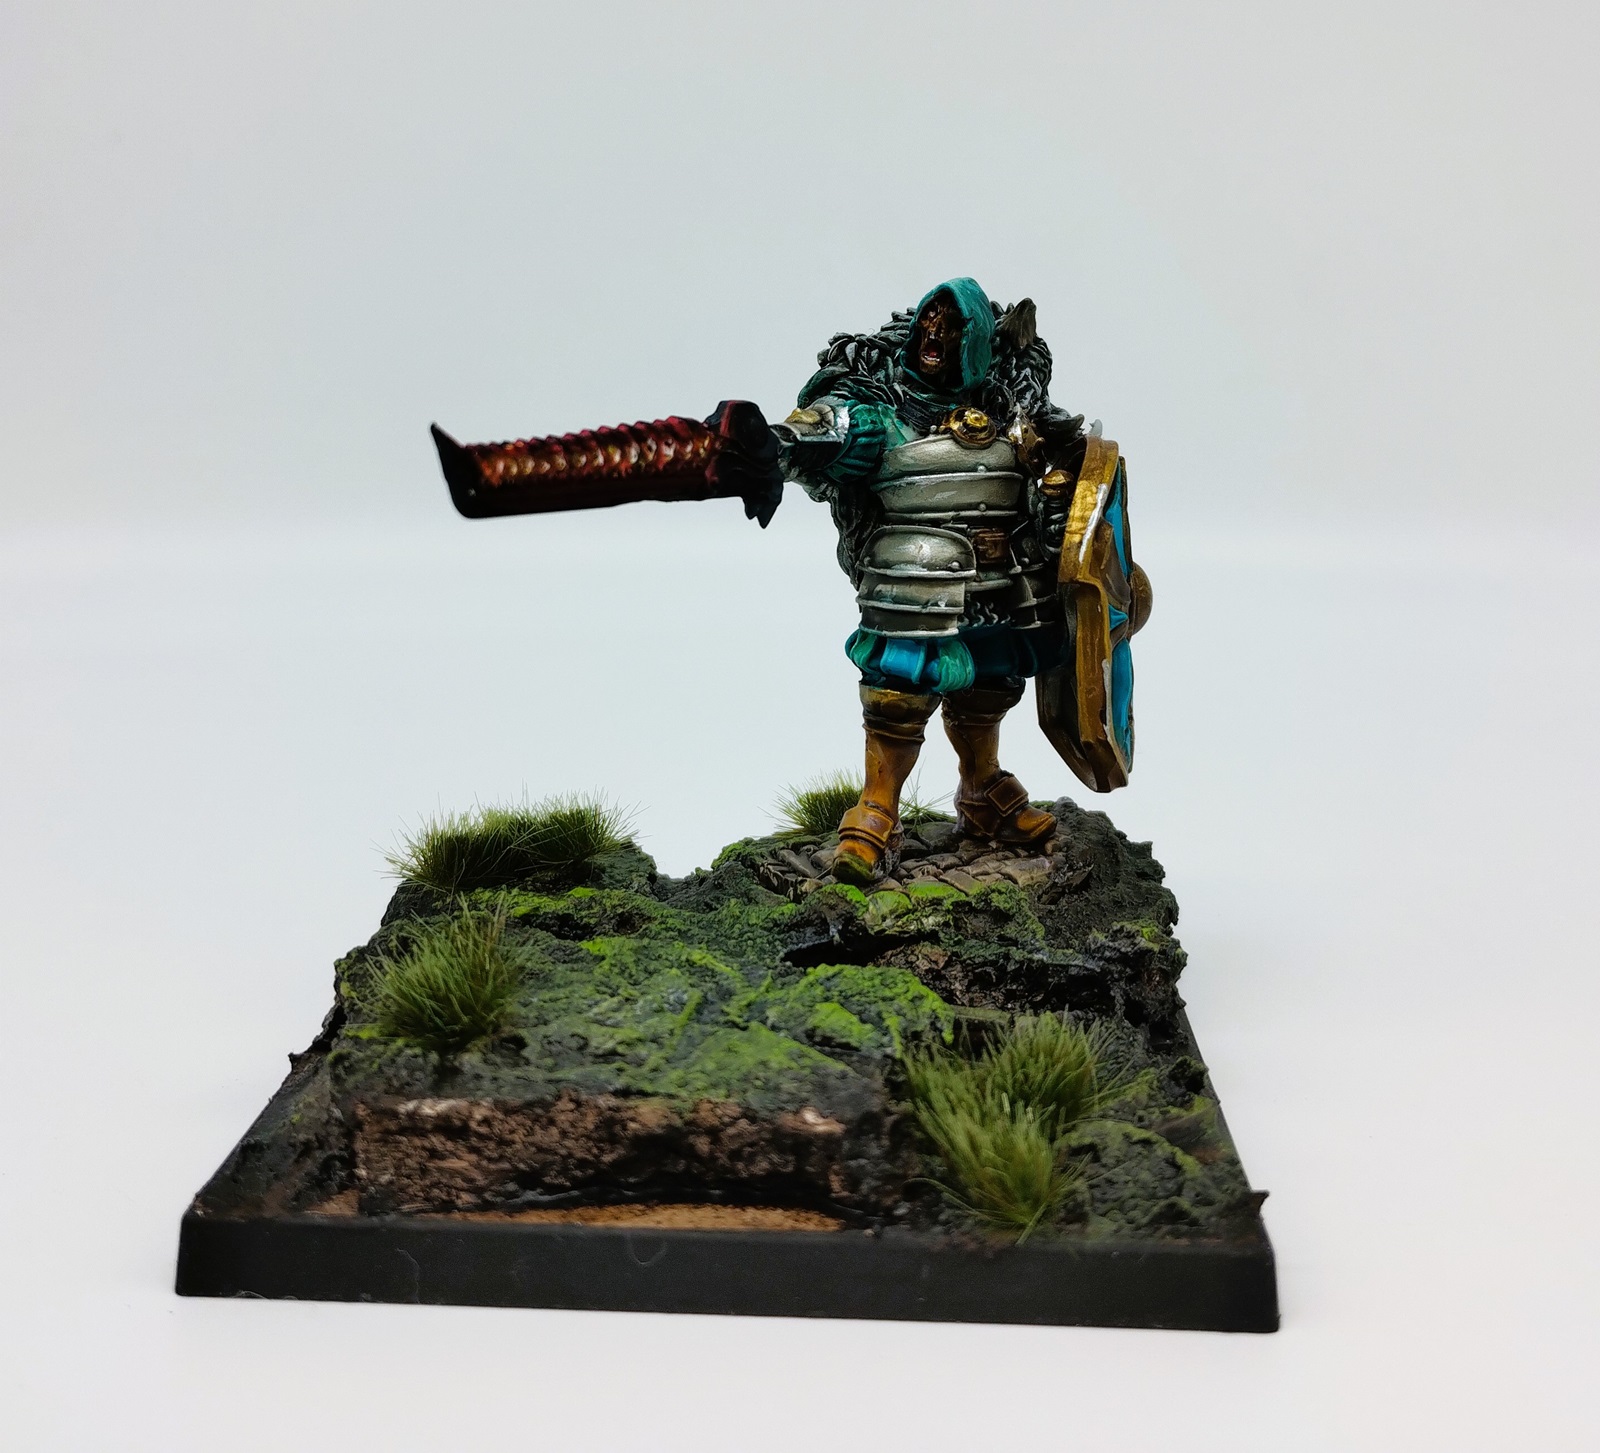
Kheres head, Legionnaire shield, Marksman Clone quiver from the Spires for a weird serrated sword. My little story for this guy is that he was a Hundred Kingdoms noble who found a cursed Hazlian sword and burned his own face off with it.
As an extra little pain point neither of these models comes with a stand, only their tiny round bases that barely supports 50% of the King’s massive scenic rock and ultra huge cape. At some point in the past I bought half a dozen extra cavalry bases from Para Bellum for incidents like this/scratch-building objectives/etcetera, but it’s still not amazing to have to dip into that stock.
The Lore
All of this comes in a thin, small 40-page paper booklet.
There are only really four pages of direct backstory here, which I found actively disappointing. Two pages are devoted to the Stone Face King and the politics of the Hold of Ghe’domn, and this is genuinely interesting for what little we get. The shortened version is that there are thirteen clans each with a legendary sword, many of which have gone missing over the years, and the Hold is prepared to throw down to get these back. They have discovered somehow that a religious fanatic Baron in the Hundred Kingdoms has claimed one of these swords as a holy relic, and the Stone Face King as a decrepit old conservative hopes to head off calls for social change by waging a short, victorious war to reclaim the weapon.
The Hundred Kingdoms section is a lot less interesting, mostly just a narrative of the life and career of Erich Schur, a wannabe Steel Legionnaire who gets sponsored by the Imperial Chamberlain because of his stick-to-it-iveness. There’s not really anything of note to him; like his model, he’s just some guy, responsible for some unspecified victories.
And that’s your lot. There’s no more here, though there are some QR codes to more stories on the website. I don’t know; it feels like such a weird thing to cheap out on and it makes the booklet unsatisfying as a thing to read unto itself.
Setup And Preamble
In particular, it leaves open a huge question about the war that is never addressed in the context of the booklet, which is: Was there an ultimatum issued?
The Dweghom are a speaking, sentient society. They learn about the location of the missing Dragonblade, presumably, through some sort of merchant or trader or ambassador in this nearby human city. Their response is immediate full military mobilization, and humanity’s response is immediate full military mobilization to fight them. During which time nobody, it seems, raises the matter diplomatically. No herald marches out in front of the Dweghom army and issues a demand that the sword be returned. We go directly from ‘The Dweghom want the thing’ to ‘open warfare’ with not so much as a sternly-worded letter in between.
And from what I can gather and imagine myself, maybe this makes sense? Dweghom are a very contentious and militaristic society, and the king specifically wants a war for internal political reasons. Maybe they embark on this kind of undeclared apocalyptic war all the time, maybe diplomacy with them is pointless – but all of this is at least remarkable, isn’t it? During this, our first ever in depth look at a conflict between these two societies, couldn’t a bit of page space be devoted to the breakdown of diplomacy or discussion of why it wasn’t a possibility in the first place? Humans and Dweghom have had conversations and formed alliances in the past – notably in the final battle against Hazlia, where they built the Sealed Temple for humanity – and even this battle ends with a diplomatic settlement of sorts.
I entirely buy that this war was inevitable; I can even easily accept that the Dweghom didn’t negotiate because for them the war was the point, but I can’t get my head around why this cunning, politically-connected Imperial Officer didn’t try to negotiate or sound out his opponents beforehand. Maybe they were on their way to a nearby Spire or something and the humans should have just gotten out of their way – the fact that Schur never even tries to find out is a difficult point to understand.
The Cool Zone

Following from this we get a series of four scenarios, each with a page of lore setup and then a mission with some unique mechanics. This is the meat of the campaign booklet so let’s take a close look at each of them and their unique mechanics.
Characters and Storied Regiments
The first unique mechanic is that some campaign missions give you access to storied regiments – unique regiments with boosted stats, ostensibly balanced by increased points costs. These are, by and large, firmly on the side of being overpowered. The Blades of Providence, for example, are a unit of Steel Legionnaires that gain +1 Attack, +1 Resolve, +1 Wound, +1 Move, Flurry, and immunity to becoming Broken for +35 points/+10 points per additional stand. That’s potentially the best upgrade package in the game and they’re all like that. It’s balanced in the sense that both sides will have some super regiment in every mission, but it means that your army composition for each scenario is going to start by building around whatever Storied Regiment you’ve got access to, or getting stomped by your opponent’s Storied Regiment.
Campaign Items
As the polar opposite of the storied regiments, some of these seem to be incomprehensibly bad. The Hundred Kingdoms gets a banner that prevents them from becoming Broken for 30 points. For 25 points they can already take a non-story Banner that prevents them from becoming Broken and always count as Inspired (admittedly on Household Guard only, but they’re kind of where you want an effect like that anyway). For a cool 30 points they can get an armour piece that gives a character +1 Evasion – which is literally only useful in the situation where the Dweghom player takes the 40 point Draegbhrud relic and is fighting one of your foot characters – which means its only value is its other effect, Quicksilver Strike, which might maybe give a foot Noble Lord specced for combat a chance at defeating a Raegh in a duel.
The Dweghom relics are much more to the point. 40 points for a free March every round on a Hellbringer or Ironclad – you could do worse.
The Missions
There are four scenarios, running from 800 points to 2500, though for reasons I cannot fathom they go out of their way to let you know that Scenario 2 is optional. I hate to break it to you this way, but all of the scenarios are optional. You do not have to do any of this, and you do not need the book’s permission to skip this one, so I do not know why they took the time to clarify this point.
There are also rewards for success and failure. If you win Scenario 1, you get a bonus on Scenario 2 and 4. If you win Scenario 2, you get a bonus on Scenario 4. If you lose Scenario 3 then you get a bonus on Scenario 4, and if you lose scenario 2 you gain a bonus on scenario 3. Strange way to arrange it. But even that raises questions, because it states ‘that the player who won battles 1 and 2’, which seems like it contradicts the optionality of Scenario 2. And the reward for these victories is getting to bring two copies of the Storied Regiments, which seems weirdly unflavourful – isn’t the point of these that there are only one? – and very mechanically tilting given how amazing the Storied Regiments are.
Scenario 1 – Ghe’Domn’s Embrace
This represents Hundred Kingdom forward forces burning supplies in advance of the Dweghom army. This is for 800-1200 points and has a couple of twists. The Hundred Kingdoms can give Schur an infinitely large warband, pairing mainstays and restricted as normal but otherwise going above four regiments, and this caps you at four stands per regiment. This is kind of a weird mess of a rule. A warband with Schur, the special Steel Legion, a Hunter Cadre, and two Imperial Rangers is already north of 700 points; this is an 800 point scenario, and as the Hundred Kingdoms you desperately want a second character because you get a second warlord out of it. It’s not really clear why you’d do any of this.
The Dweghom, as is tradition by this point, get a more straightforward benefit: the Stone Face King auto-seizes objective zones and friendly regiments gain +1 attack characteristic when in range of objective zones. The catch is that they can’t deploy on round 1 and can’t have regiments of more than 4 stands – neither being much of a disadvantage at all for Dweg players at 800 points, who can simply opt to skip Light units and suffer no further consequences.
Scenario 2 – Tearing Down The Veiled Bridge
This is a scenario only for First Blood and it’s an interesting one. The Dweghom deploy in the center of the board and the Hundred Kingdoms can deploy on any of the table edges. It does seem like a fairly exciting scenario though – there are four support pillars, and the Hundred Kingdoms player is trying to get to them and apply explosives. The Dweghom player can remove planted explosives, but not safely – removing an explosive results in an instant detonation that does a hit with Smite to every model within 2’. The Hundred Kingdoms player only has 8-12 explosive tokens to work with, so it’s worth sending a dwarf to the moon to remove one from play.
The catch is the Hundred Kingdoms player needs to destroy all four pillars – if even one survives after 10 rounds then the Dweghom wins. Perhaps it’s the right move to ignore three of the pillars and form a ring of iron and beards around one, or perhaps the Dweghom player wants to aggressively range out to kill explosive bearers before they can close in. It’s an exciting pitch for a scenario with a range of possible responses, and I think it could result in some really interesting matches.
Scenario 3 – The March Through the Princely Gates
This is an absolute logjam of a scenario, for 1400-1700 points. There are two objective zones directly along the center line, meaning that of a 48’ wide table everyone’s going to want to be in an 18’ column. The Hundred Kingdoms comes with 140 points of free Crossbowmen occupying a piece of garrison terrain in the center and again block the Dweghom from deploying on turn one. Given how the objectives and points are arranged, if the Hundred Kingdoms player can keep the Crossbowmen alive then they win the game – and if they can’t they almost certainly lose it.
This is going to be a rough one for the Hundred Kingdoms because Dweghom have a lot of very powerful ranged attacks and offensive magic and there is no way to bodyblock a Size 3 building, defense 2 or nah. I think this almost always ends with a burning building full of corpses so it’s up to the Hundred Kingdoms player to see if they can leverage a free 140 points to table their opponents.
Scenario 4 – The Fields of Pravia
This is a 2000-2500 point scenario to represent the final battle; mechanically it’s the scenario Foresight with the Hundred Kingdoms player getting to pick two zones each round and discard the one they dislike, and the Dweghom getting to score with Light regiments. For once, this seems like a setup that favours the Hundred Kingdoms. There’s also unlimited access to the Storied Regiments and 80 points of free character upgrades for whoever lost scenario 3, but I’m glad they kept the mechanical twists fairly restrained here – Foresight is already a complex scenario and the more you add the more the mental load becomes.
The Endings
We wrap up with two two-page spreads of box text detailing what victory for each side looks like. Disappointingly, this is a choice without a choice – both outcomes have essentially the same things happening in the same order – Schur and the King fight, they are interrupted by the Baron, he goes down, the King gets the sword, the Dweghom retreat immediately leaving the city untouched.
It’s also clear which one is the ‘intended’ ending – the Hundred Kingdoms victory is half a page longer, far more dramatic and narrative, and involves two warriors locking eyes and sharing a warrior’s nod that transcends cultural boundaries before the sides part. It is far more cinematic and satisfying, a victory born of cunning and against the odds. The Dweghom victory, by comparison, is kind of a brutal downer where the King socks out Schur, kills the Baron on the backswing, and rolls out having learned nothing.
Final Thoughts
Corvus Belli’s Infinity has a long standing sequence of campaign packs called Dire Foes – two characters and a civilian model along with a mission booklet, in a very similar setup to what Para Bellum is doing here. The problem with the Dire Foes setup, though, was that the miniatures were the actually valuable part and the campaign booklet always deployed directly into the recycle bin. Eventually Corvus Belli stopped wasting the paper and published the missions directly onto their website, where they were more widely useful to the rare souls who ran narrative campaigns and needed a wide array of scenarios to draw from.
The big difference with Dire Foes, though, was that the miniatures therein had unique rules usable in normal games – in fact, some characters became lynchpins of their entire faction. Para Bellum has to this point resisted the call of unique named characters and while the Stone Face King can serve as an ordinary Raegh just fine it feels like there’s a missed opportunity here. In a word: artifacts.
Every faction has a long list of extremely cool thematic relics: the Armour of Dominion! The Dancing Scimitar! Avatar Projection! This stuff has massive mechanical and thematic weight to it but modelling it is essentially impossible. Conquest’s characters, being resin, do not lend themselves well to conversions, and there’s a deliberate lack of flash and gubbins to the sculpts (which I’m generally in favour of, clean lines and easy painting) that makes it hard to find that perfect doodad to set the character apart. I’ve gone through four Conquest factions at this point and my bits box is still shockingly shallow compared to the conversion possibilities implied in every 40K kit.
What I want out of this series, then, is a chance to see alternate models of classic character types, set apart by the fact that they’re carrying unique relics. As with Dire Foes, I don’t imagine I’ll get a lot of use out of the campaign booklet – I actually happen to be the rare Hundred Kingdoms player with a regular Dweghom opponent, and I’m actually a huge narrative campaign buff, so I should be the perfect target for this. But even so, I don’t imagine I’m going to ever spend my limited gaming evenings on a couple of strangely balanced 1000 point scenarios where I have to design my army list around superstar narrative regiments. I’d hope that the next issue of this changes up the format; less page count spent on units that invariably will take the form of ‘these guys are harder and stronger than regular guys’, more on the kind of Codex-style lore snippets that can inspire a whole army.
Have any questions or feedback? Drop us a note in the comments below or email us at contact@goonhammer.com. Want articles like this linked in your inbox every Monday morning? Sign up for our newsletter. And don’t forget that you can support us on Patreon for backer rewards like early video content, Administratum access, an ad-free experience on our website and more.
